 In the first workshop for my second year we have been taught some of the basics of processing. Learning how to create simple shapes, movements and loops. Learning how to use both ‘void setup’ and ‘void draw’. During this I have learnt how to code animation to respond to mouse movements and rotation movements. Further on I combined both mouse response and rotation together to create all sorts of basic digital art.
Images
First Kinetic Typography – War Never Changes

As one of our mini projects we were told to produce some pieces of kinetic typography. To start this mini project I needed to find some scenes from films and games, scenes with a lot of speech/conversation. After looking through and listening to various amounts of scenes, I decided on the voice over in the introduction to one of my favourite games, Fallout 3. My first aim is to write out all the text and place each word in sync with the audio in a stylish manner.
My next steps would be deciding on colours and animations. At the moment this Fallout project is in black and white as the text is more important at this stage. I will aim to use colours that reflect the tone of the actors words or what those words imply. Something as simple as the word blood being red to symbolise it’s meaning. This idea will also apply to the animations of the text, the text animations will reflect implications of the word.
My steps after this will be to produce another Kinetic Typography that has all the elements I have learnt from this current project and some more sophisticated ideas.
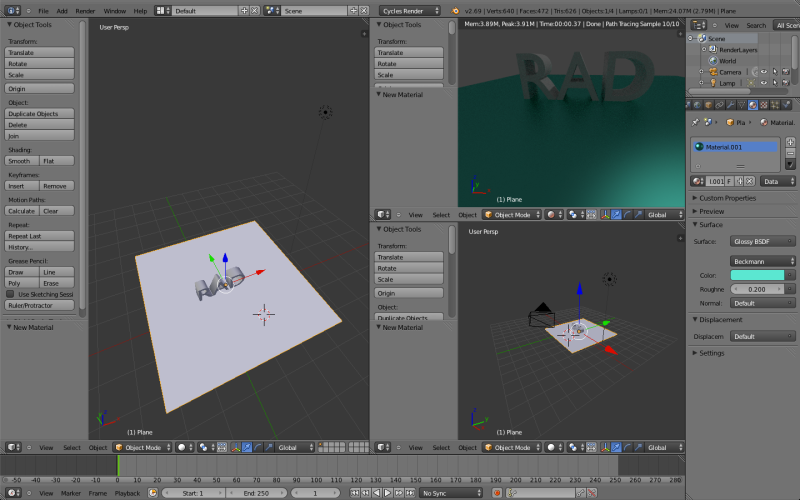
3D Text Animation

I have progressed from a simple 3D text design to creating text animation. This design follows a tutorial I found on Youtube I have just changed the colours and what the text says. Creating this 3D animation has given me a better understanding of using disperse effects, camera shots and using keyframes in Blender.
My next step is to render the animation out correctly and then upload it to my blog.
Starting 3D design in Blender

In one of my first Blender seminars we were shown how to extrude text and create text and lighting. This is a simple 3D text design I have created in order to gain an understanding in using camera angles and lighting. It was also a practise to see if I could render out properly.
My next steps are to make a text animation, something that either moves, disappears, dissolves or turns into smoke.
Beginning with Blender
I have just recently been introduced to Blender in my seminars. I’m completely new to this programme so I have begun with making 3D text. My aim is to create a lighting effect behind the text to create a shadow, to emphasise the 3D shape. At this stage colours and colour testing are not too important as I am just getting the basics down.
Once I have created 3D text with lighting I am going to try and animate the text with some sort of dissolving animation. In this way I will be able to get an idea of how to animate other 3D shapes. My biggest aim would be to learn how to create an animation of a person walking, this will take a lot more time compared to text animation.
Flash Animation

I have finally finished my flash animation. It has take quite a few hours to create this. To make the animation fit in sync with the audio/music. Although it took a long time for such a short animation I think I am going to create another one that is longer with more variation.
You can find this animation on my website as it is too small to upload to Youtube or Vimeo:
dakar.bournemouth.ac.uk/~hstevens.portfolio
Flash Animation

We were set the task to create a very small 22mm animation with audio. For my design I chose to go for an animation that looked look a very basic set of speakers using white hollow circles. I then went on to create smaller circles within the bigger ones that reduce in size very quickly to give a vibration effect. As if the speakers were actually playing and moving
Alphabet Photos

As part of our Alphabet Photography project we went around Bournemouth town and the pier in search of potential letters. Here are some of the ones we found. I found this project quite interesting in a sense that it took some interpretive creativity to find some interesting letters.
Alphabet Photography Project

As one of my mini projects I was paired up with one of my course mates and we were set the task of taking photos of objects that looked like the letters of the alphabet.
Group Project

In this group project, the six of us were given a brief to create a website and a series of videos based on a selection of topics. The website is used to host these videos and provide further information on them. As a group we decided to go for the topic of technology. Under this we decided to create a product that may or may not exist. We created and developed the idea of a contact lens that augments your vision, enhancing your ability to carry out everyday tasks. Following similar ideas and concepts to google glass but following a more organic feel rather than a set of physical glasses. We also decided to come up with a company that would be the developers of this augmented technology, that name was ‘Convex’ (The name reflecting the idea of something curved and natural looking).
One member of the group created this logo and as group we went through many colour schemes deciding the best three colours.
I was part of the video production, getting the footage for the video series. I came up with the idea of emphasising how life is difficult with the Convex lens and how easy it is with it. Giving the ‘before’ scenes a grungy black and white filter over the video and the ‘after’ scenes in high contrast with brighter colours compared to the ‘before’ scenes.
